Oups, i've been MIA again. Sorry sorry. Me and hubby were busy do spring cleaning for Chinese New Year. Everyday busy sorting old things and make crucial decision: keep or throw. Mostly we throw. Stared from our own bedroom, living room, dining area, kitchen, then follow by my Sis in law's room (used to be her room). Since she moved back to Jakarta to be with her hubby, her room were full with our rare-used furniture and other stuffs. We have been avoiding to tidy up her room ^_^ . But, uh-oh due to CNY, we have to. Lastly was my workshop room. Lucky i always tidy up after finishing any kind of projects, so it was not too much of work.
Now, time for little bit story about the tutorial. One day, i search on projects/ideas for simple, easy, and cheap clutches, and chrome gave me placemat clucth's tutorials. I was amazed by the people's creativity. I never thought a placemat can be turned into lovely cluthes and even tote bags. You can go and search at www.tipjunkie.com, www.favecrafts.com and many more. Many good tutorials listed there.
Honestly, i never use any placemat when dining after living in Singapore. My mom used to had those placemats made from plastics with cute patterns. After looking at the tutorials and images from internet, i know right away i had to try and make one. And there is only one place i could think of that sells many varieties fabric placemat, Daiso.
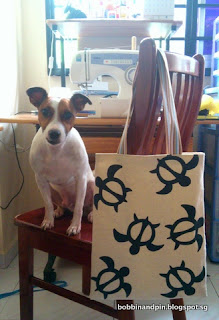
True! On the kitchen/dining aisle there are a lot of fabric placemats. Mat using waterproof material also can be found there. The one using bamboo also have. Lovely! My choice was tortoises patterns. The fabric color was natural/off white and the tortoise in navy blue. Love at first sight.
Okay let's begin. We need:
- 1pc placemat of your choice (Mine i use from Daiso, size approximately 31x41cm. You can use whatever size you want.) - This will be the outer fabric (I'm using 2 different fabrics, for the back i'm using plain calico with matching color (of course you can choose same fabric or different colors - be creative ^^ )
- 2pcs 31x41cm fabric for inner lining (Any colors you prefer. Mine is beige cotton poplin.)
- 2pcs 62cm long cotton webbing for straps (Again, you can choose to make 1 or just use the ready use type.)
- Matching color thread, scissor, ruler, seam ripper and fray stop.
- 1 hour of your spare time.
I bought 2 placemats. I'm thinking 1 for making tote bag and the other 1 clutch purse.
Lay the placemat on the flat table. I noticed the seams too bulky for my machine, therefore i open all 4 seams using seam ripper. If your machine can handle bulky seams go ahead skip this step. Or you can cut the bulky parts to whatever size you want.
Calico and placemat right side together. Then sew the 3 sides using straight stich with 1cm seams allowance but leave 2cm on the top side open. You will have to do the same with the lining. I'm using binder clips instead of pins.
Turn the fabric. You can press flat using hot iron. For the lining no need to turn.
Position the edge of the straps 7cm from each side of the top bag. Then sew or basted 1cm seam allowances. You might want to dab little bit of fray stop at the edge of each straps to prevent fraying - This is optional.
Tuck the outer fabric inside the lining. Right sides facing each other. Pins the top. Make sure the side seams all matched nicely. Then you will need sew the top 2cm seams allowance, straight stich. Don't forget to leave 10cm opening for turning.
Slowly pull the outer fabric out from the 10cm opening. If you want, you can cut the corner on the lining (Don't cut the seams). Then tuck the lining inside the outer fabric. You can iron the bag to make it tidy. Lastly, top stich the top side, all around to close up the opening.
Ta-da, your bag now is ready to be use and show-off (Hehe).
Currently, i'm using this tote bag. I use it to carry books, put my purse, smartphone and everything inside. I bring this tote when going back Jakarta. Love this tote. Enjoy!
Okay, Harley wants me to take his photo together with my new tote bag.
Thank you so much for visiting my blog and reading my tutorials. I'm not expert on sewing yet, i'm just a self-taught sewer. If you have any comments or opinions please don't hesitate to mention on "leave a comment" box below. I hope hearing from you soon.
Let's Make Them.


No comments:
Post a Comment